Formatting Headings in Dreamweaver CS4
Next we will need to format the headings and subheadings within the content.
To do this, go back into the Dreamweaver document window and select the heading text.
Apply the Heading 1 tag to it by selecting Format > Paragraph format > Heading 1.
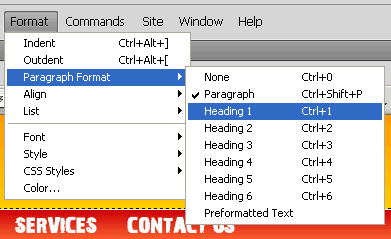
Similarly for the subheadings, select the subheading text and apply the Heading 2 tag to it [Format > Paragraph format > Heading 2].
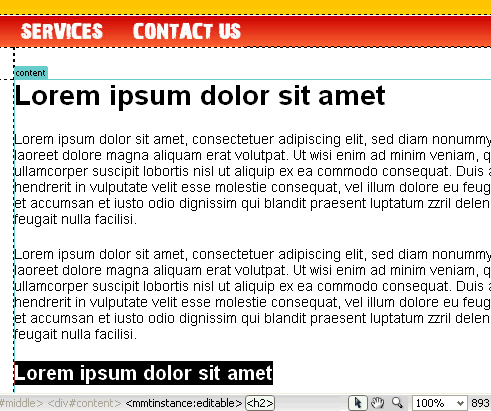
Styling our Headings and Subheadings
Now let us style the Heading 1 and Heading 2 tags to match the look we created in our layout.
To do this we will need to create a new style rule for the tags H1 and H2 in our styles.css file.
We can do this from the ‘Properties’ Panel as well by clicking on the “Edit Rule” button.

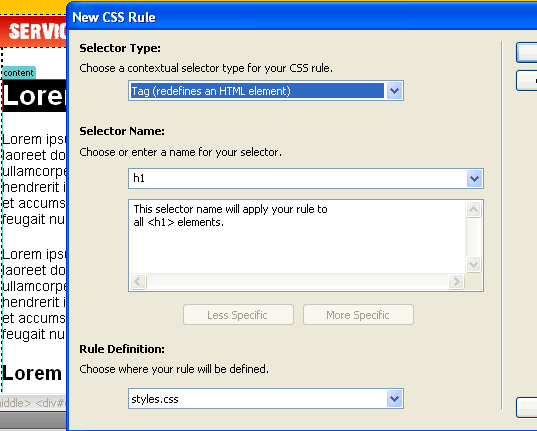
In the ‘New CSS Rule’ Screen that opens up select the follwing:
- Selector Type: Tag
- Selector Name: h1
- Rule Definition: styles.css
- Click OK
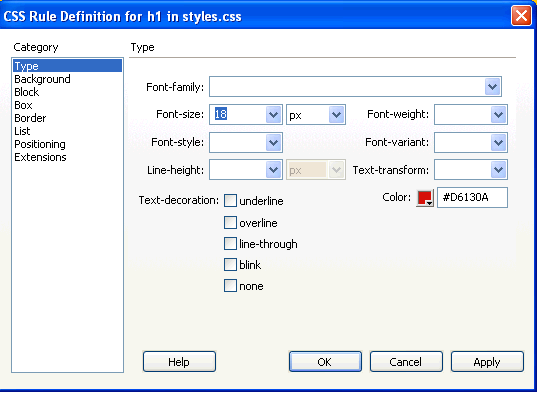
In the CSS Rule Definition for h1 screen give the following properties:
- Type > Font-size: 18 px
- Type > Color:
 #D6130A
 - Click OK
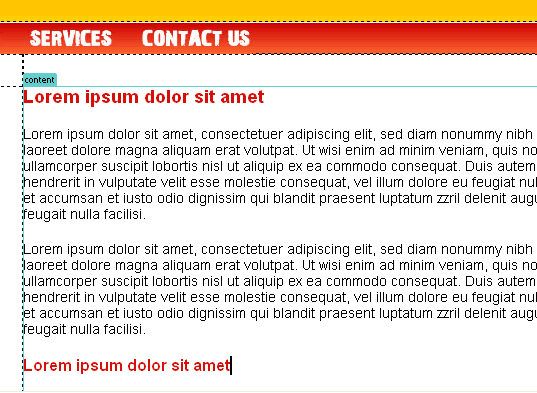
Similarly define the style for the H2 tag. You page will not look like this:
Dreamweaver CS4 Tutorials
- Dreamweaver CS4 Tutorial
- Define a New Site in Dreamweaver CS4
- Create a template in Dreamweaver CS4
- Design your template in Dreamweaver CS4
- Design the CSS Style Sheet in Dreamweaver CS4
- Insert Images in Dreamweaver CS4
- Creating the Menu in Dreamweaver CS4
- Content in Dreamweaver CS4
- Insert Editable Regions in the Dreamweaver Template
- Dreamweaver CS4 Template Based Web Pages
- Formatting Headings in Dreamweaver CS4
- Formatting Images in Dreamweaver CS4
- Linking pages in Dreamweaver CS4
- Forms in Dreamweaver CS4
- Dreamweaver CS4 Form Validation Tutorial
- Tables in Dreamweaver CS4
- Testing the Website in the Browser
- Upload your site with Dreamweaver CS4
- How to validate your Contact PHP form in Dreamweaver CS4
Tags: Dreamweaver CS4 Tutorials, Formatting Headings in Dreamweaver CS4
Posted in Dreamweaver | No Comments »
