Keyframes in Flash CS3
Keyframes in Flash CS3 is an important concept to understand.
The Timeline, Frames and Keyframes
The timeline consists fo many layers and many frames within each layer. In the picture of the timeline below the 10th frame of the layer "Train" is selected.

The first frames of all the layers are keyframes and are indicated by a gray background and black dot. The remaining frames are all blank.
Continuing with the tutorial let us begin to animate the wheel in the "wheel animation" movie clip by creating new keyframes within the movie clip's timeline.
Getting into the "Wheel Animation" Symbol
Let’s begin by getting into the symbol “wheel animation”. To do this:
- Double click the wheel on the stage.
- You will see the main stage elements fade out slightly and only the wheel remains clear.
- Also, you will see the movie clip symbol name “wheel animation” appear next to “Scene 1”.

- You can always click on “Scene 1” to go back to the main stage area.
Animating the Wheel - Part 1
Now let’s make the wheel go round.
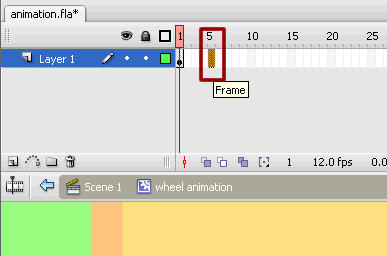
- Click on the 5th frame in the timeline of the movie clip "wheel animation".

- Insert a key frame (right click + “Insert Key Frame”)
- Now rotate it 90 degrees counter clock wise
Modify > Transform > Rotate 90 degrees CSW
- Though it might look like the wheel is the same, Flash knows that the wheel has rotated and you will be able to see the results in the animation later.
- Insert another key frame at the 10th,15th and 20th frames rotating each time.
- Take a look at the wheel animation.
Control > Test Movie
- You will notice that the wheel is turning but the movement is rather jerky.
- Step 1: Create a new Flash CS3 document
- Step 2: Add text
- Step 3: Graphic Symbols
- Step 4: Layers
- Step 5: Draw Shapes (Rectangle)
- Step 6: Draw Shapes (Oval)
- Step 7: Draw Lines
- Step 8: Reuse Symbols
- Step 9: Resize and Rotate objects
- Step 10: Paste in Place
- Step 11: Align
- Step 12: Change colors of symbols
- Step 13: Transform Options
- Step 14: Movie Clip Symbols
- Step 15: Keyframes
- Step 16: Motion Tweens
- Step 17: Lock Layers
- Step 18. Import an Image
- Step 19: Publish the Flash file
- Flash Photo Gallery Tutorial
- Flash CS3 Quiz Tutorial
- Flash CS3 Tutorial Part 2: Create a Simple Website with ActionScript 3.0
- Free Flash CS3 Website Template
- Flash CS6 Tutorial
- Flash CS6 HTML5 Tutorial
Suggestions for Improvement? If you have a suggestion to improve this tutorial please contact us. We would love to hear from you.
Flash is part of the Adobe Creative Suite
Streamline web design, development, and maintenance. Order Now!

