Free Flash CS3 Photo Gallery Tutorial
 View Demo |
In this tutorial, we will create a photo gallery using the Flash CS3 Photo Slideshow template.
If you are a beginner you please ensure that you have gone through the Flash CS3 Tutorial before attempting this.
You might also be interested in professionally designed Flash photo galleries (create and manage your flash photo galleries without having to learn Flash), FlashLoaded Photo Components and Wondershare Flash Album Studio.
You can download a 30 day trial version of Flash from the Adobe.com website.
- Create a new Flash document choosing the existing Photo slideshow template.
File > New > Templates tab > 'Photo Slideshows' Category > 'Modern Photo Slideshow' Template

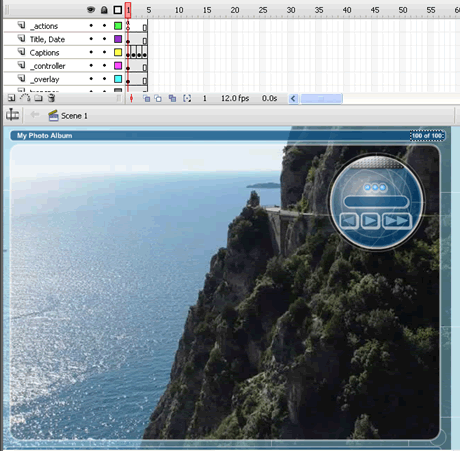
- A fully functional photo album with some default photos will open.

- Test the file to see how it works
Control > Test Movie
- Save the Flash document, giving it a name.
File > Save
- Open the Library
Window > Library

- Open the the 'photos' folder.
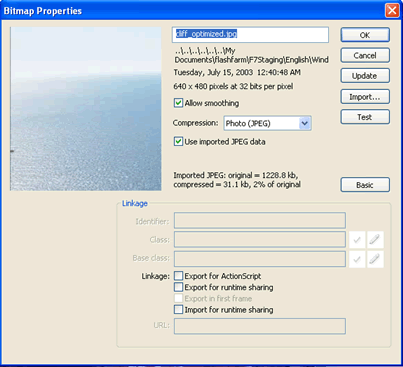
- Double click a photo to get the'Bitmap Properties' window.

- Click the 'Import' button and import your photo. It will replace the default image. The photo album is designed to show photos of the dimension 640x480 pixels so ensure your photos are of those dimensions.
- Repeat the proceedure for the the other photos.
- Select the first frame in the captions layer of the timeline. The default caption for the first photo will get selected. You can see it at the bottom of the stage area.

- Double click on the caption and edit the text to the caption of your photo. Repeat for all captions.

Congratulations! Your Photo Gallery is ready!
To Add an Extra Photo
The template comes with a default of 4 photos. If you have more than 4 photos follow these steps:
- Insert a new set of frames after the last frame on each layer
Click on the frame title of the last frame > Insert > Timeline > Frame

- Insert keyframes in the new frames on the layers entitled 'Captions' and 'picture layer'.
Click on the frame > Insert > Timeline > Keyframe
- Import the extra photo into the library and then put it into the 'photos' folder.
- File > Import > Import to Library
- Open the Library Window > Drag the new photo into the 'photos' folder
- In the timeline, click on the last keyframe of the 'picture layer'. Then click on the photo in the stage. The photo will get selected and it will be a duplicate of the photo in the previous frame.
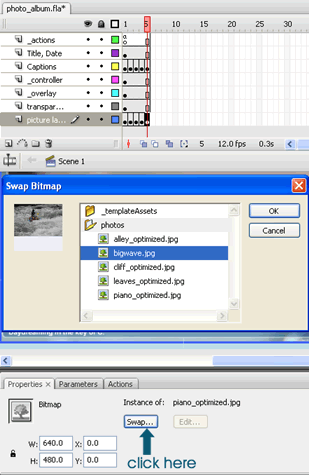
- Swap it with the new photo in the Properties window.
In the 'Properties' window, click the 'Swap' button > Select the new photo in the 'Swap Bitmap' window that opens up > Click OK

- Change the caption for the photo.
- Test the photo album and repeat the process for all the extra photos you want to add.
Delete Extra Photos
In case you have less than 4 photos in your album simply remove the extra set of frames.
Click on the frame title of the frames you want ot remove > Edit > Timeline > Remove Frames
-
Professionally Designed Flash Photo Galleries - You can create a photo album and edit the text without using Flash.
Go to Flash CS3 Quiz Tutorial >>
- Step 1: Create a new Flash CS3 document
- Step 2: Add text
- Step 3: Graphic Symbols
- Step 4: Layers
- Step 5: Draw Shapes (Rectangle)
- Step 6: Draw Shapes (Oval)
- Step 7: Draw Lines
- Step 8: Reuse Symbols
- Step 9: Resize and Rotate objects
- Step 10: Paste in Place
- Step 11: Align
- Step 12: Change colors of symbols
- Step 13: Transform Options
- Step 14: Movie Clip Symbols
- Step 15: Keyframes
- Step 16: Motion Tweens
- Step 17: Lock Layers
- Step 18. Import an Image
- Step 19: Publish the Flash file
- Flash Photo Gallery Tutorial
- Flash CS3 Quiz Tutorial
- Flash CS3 Tutorial Part 2: Create a Simple Website with ActionScript 3.0
- Free Flash CS3 Website Template
- Flash CS6 Tutorial
- Flash CS6 HTML5 Tutorial
Suggestions for Improvement? If you have a suggestion to improve this tutorial please contact us. We would love to hear from you.
Flash is part of the Adobe Creative Suite
Streamline web design, development, and maintenance. Order Now!

