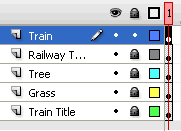
Lock Layers in Flash CS3
Locking layers in Flash CS3 is useful when we want to manipulate some elements on the stage without disturbing any of the others. Another option that is helpful is the hide layer option. This will hide the layer so that we can work more easily as the number of elements on the stage increase, but will still appear in the final output.
Continuing with the tutorial, let us use the Lock Layer option to easily select the various parts of the train.
Train Animation
Now that we have all the parts of the train ready, we are ready to animate it.
- Select all the parts of the train (including wheels).
- The easiest way to select all the parts of the train is to lock all the other layers first so that the elements in those layers don't get selected.
- To lock a layer, click on the dot below the lock symbol next to the layer name in the timeline.
- Another easier way to select all the parts of the is to simply click the key frame on the train layer.
- Convert to a graphic symbol named “train”.
- Now select it again (now “train” symbol) and convert it to a movie symbol named “train animation”.
- Double click on it to get into the symbol “train animation”.
- In the 1st frame position the train on the far right (outside the stage area).
- Insert a keyframe on the 60th frame (since the frame rate is 12 frames/ sec, and we want the train animation to take 5 seconds)
- Position the train to the far left (outside the stage area).
- Create a motion tween between the two frames.
Now test the movie [Control > Test Movie]
You will notice that the train enters from the right travels across the stage and exits from the left. And then the animation loops again and again.
- Step 1: Create a new Flash CS3 document
- Step 2: Add text
- Step 3: Graphic Symbols
- Step 4: Layers
- Step 5: Draw Shapes (Rectangle)
- Step 6: Draw Shapes (Oval)
- Step 7: Draw Lines
- Step 8: Reuse Symbols
- Step 9: Resize and Rotate objects
- Step 10: Paste in Place
- Step 11: Align
- Step 12: Change colors of symbols
- Step 13: Transform Options
- Step 14: Movie Clip Symbols
- Step 15: Keyframes
- Step 16: Motion Tweens
- Step 17: Lock Layers
- Step 18. Import an Image
- Step 19: Publish the Flash file
- Flash Photo Gallery Tutorial
- Flash CS3 Quiz Tutorial
- Flash CS3 Tutorial Part 2: Create a Simple Website with ActionScript 3.0
- Free Flash CS3 Website Template
- Flash CS6 Tutorial
- Flash CS6 HTML5 Tutorial
Suggestions for Improvement? If you have a suggestion to improve this tutorial please contact us. We would love to hear from you.
Flash is part of the Adobe Creative Suite
Streamline web design, development, and maintenance. Order Now!